Do you enjoy doughnuts? 🍩🍩🍩 I always love a good doughnut, especially ones topped with chocolates! 😋 It has been one of the bakes that I gave myself a goal to make, though I kept putting it off to avoid the messiness that could come with deep frying in my small apartment. (The nightmare scenario of hot oil spluttering all over my bed! 😰😰) Therefore, this time while I am staying at my family’s home, I decided to make full use of the kitchen here to make some doughnuts.😉 (Though my mum wasn’t particularly happy with the mess I created afterwards…😅😅)
For my first time making them, I felt I did a decent job.😁 I adapted a recipe from the allrecipes UK website (Link: http://allrecipes.co.uk/recipe/4920/crispy-and-creamy-doughnuts.aspx), though I omitted the egg as I ran out of them in the kitchen and added a bit more water in place of it.😛 I made two kinds of doughnuts, one with chocolate and the other was lemon and blueberry. I did have a bit of issue with the dough being too wet and sticky, so was struggling with the shaping until I added more flour. When it came to the frying, I did a few doughnuts as testers to gauge how I should fry them and they seemed to come out better when fried with a lower heat. (No, I didn’t have a thermomter…) And I underestimated how big these doughnuts would expand as they cook, so they came out quite big. At least we were hungry lol! 😂
Have you made doughnuts before? Feel free to leave any thoughts or advices in the comments below! 😊
How often do you spend time reminiscing about your childhood? A few days ago, I managed to dig up my old diaries from over 10 years ago, hidden behind piles of books on my old book shelf in my family home. Reading back, I felt a wave of nostalgia. Come to think of it, so much had happened within these past 10 years with many ups and downs. Yet, I don’t feel much different from who I was back then. I always seem to have been the kind of person who strives for and wants more in life, no matter how tiring it can get. But at times I feel lost, not knowing where to go next, questioning what I am doing and feeling demotivated.
I remember when I was a child I used to get so excited over the simplest things in life. Cartoons, comics, games… But my passion in these things slowly somehow dwindled. One of the many things though that get me all hyped up back when I was a little kid was the agar jelly that my mum used to make.
Agar is a type of seaweed that can be used as a substitute for gelatine, and it is widely used in many Asian desserts. It is also suitable for vegetarians and vegans. My family often used strips of dried agar and rock sugar to make jelly as snacks since the recipe is very straightforward (see below). Most of the times we have them plain, but we also sometimes like to incorporate other things such as coconut milk into the jelly.
My mum taught me how to make them today, and the process really made me reflect about things now in my life. Why make things complicated when you can have them so simple? Perhaps simplicity really is the best policy to happiness. 🙂🙂 Do you agree? 🤗
Plain Agar Jelly
Quantity: about 30 small jellies
Ingredients:
450g water
7g dried agar strips
80g rock sugar
Method:
1. Heat the water in a saucepan to boil.
2. Add the agar and sugar to the boiling water. Continue to heat until they have fully dissolved.
3. Pour the mixture into moulds of your choosing. Place in fridge for about 15 mins, or until set. (It should set quite quickly.)
4. Remove from moulds gently.
For the coconut agar jelly, substitute about half of the water with coconut milk.
As an avid foodie, I am always constantly looking for new places and new experiences wherever I go. A few days ago, I came across a website depicting Michelin restaurants and I discovered there are in fact currently four such restaurants here in Edinburgh: Number One, 21212, The Kitchin and Martin Wishart. (To be honest, I am a bit embarrassed that I never heard of any of them until now despite having spent years here lol. Apparently there are quite well known.😂😂) I had a few experiences dining in Michelin restaurants in Hong Kong and London years ago, but never elsewhere. (N.B. I just found out that Yauatcha in Soho which my friend and I visited a couple weeks ago also has a Michelin star!Link👉https://tangosbaking.home.blog/2019/08/02/dim-sum-and-desserts/) So, my mum and I decided to pay one of those restaurants for a visit during lunch hours (which put Number One out of question since they don’t appear to do lunch hours.) I first phoned up the Kitchin, but was taken back in that they are fully booked for the whole of August and are placing people in waiting list for September!😱😱 So I was glad when I called Martin Wishart next, they have spaces available for the next day.😀
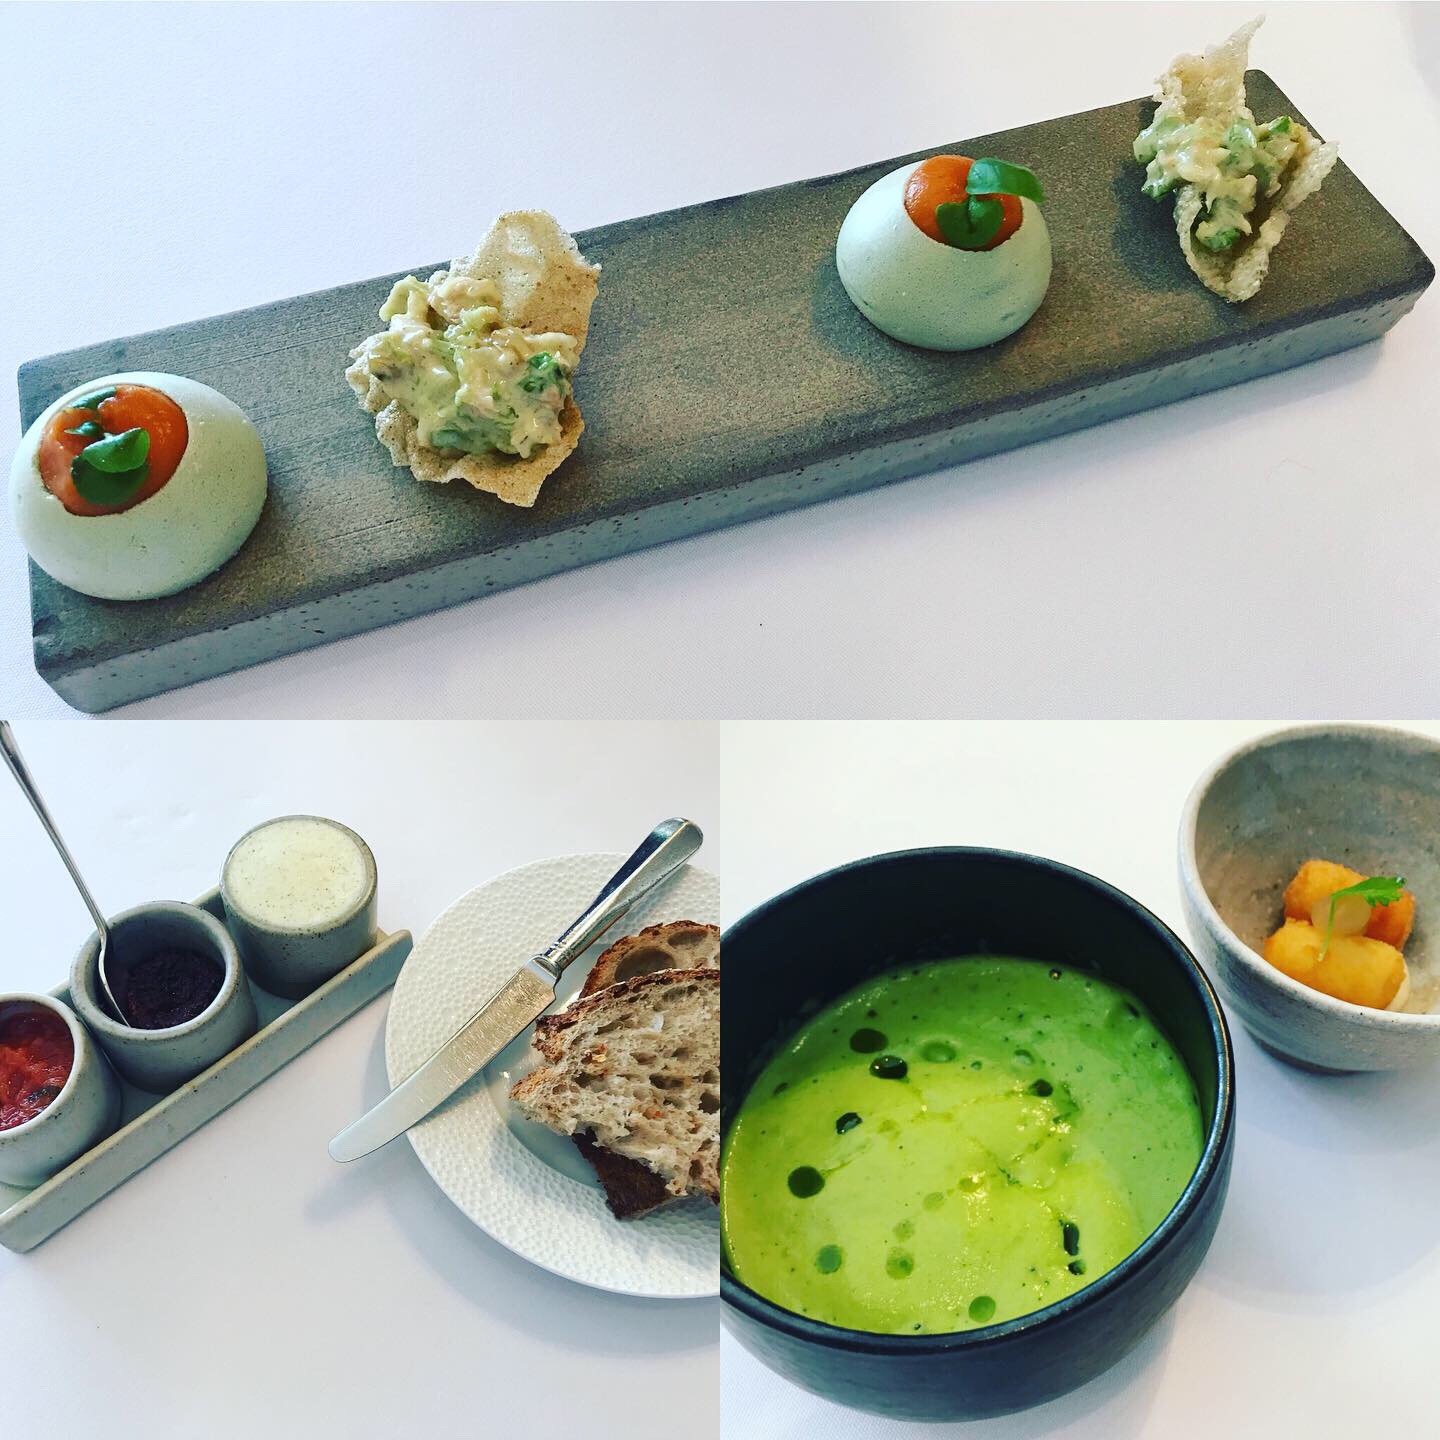
The restaurant is located by a river in Leith, and the beautiful interior certainly made a bold statement from the minute I stepped in. The service was absolutely outstanding as one may come to expect. (In fact, I felt I was slightly taken a back by how attentive they were. Awks. 😂😂) The minute we sat down (and before we were provided the menus), food already came rolling in the form of canapés and complementary appetisers.
Complementary appetisers: two canapés of basil macarons with tomato gazpacho and cumin crackers with curried cabbage slaw (top); sourdough served with seaweed butter, smashed olives and tomato sauce (bottom left); pea soup & croquettes (bottom right).
Right out from the gate, the canapés already impressed, especially the savoury macarons (which my mum was still going on about afterwards! ❤️😂) This unique take on macarons had a very delicate texture that instantly melted in the mouth, and I loved how they presented the classic combo of basil and tomato in such an innovate way. Definitely very inspiring!👍 The crackers were also very delicious (and kind of reminded me of coronation chicken lol!) I also loved the croquettes and the pea soup (though my mum were slightly more impartial as she felt the croquettes were slightly too salty and the earthy taste of the soup a bit too strong😅). I was really intrigued by the condiments that were served with the sourdough, especially the seaweed butter, though we couldn’t really taste the seaweed in it. (My mum preferred the tomato sauce, though I was more of a fan of the savoury olives.)
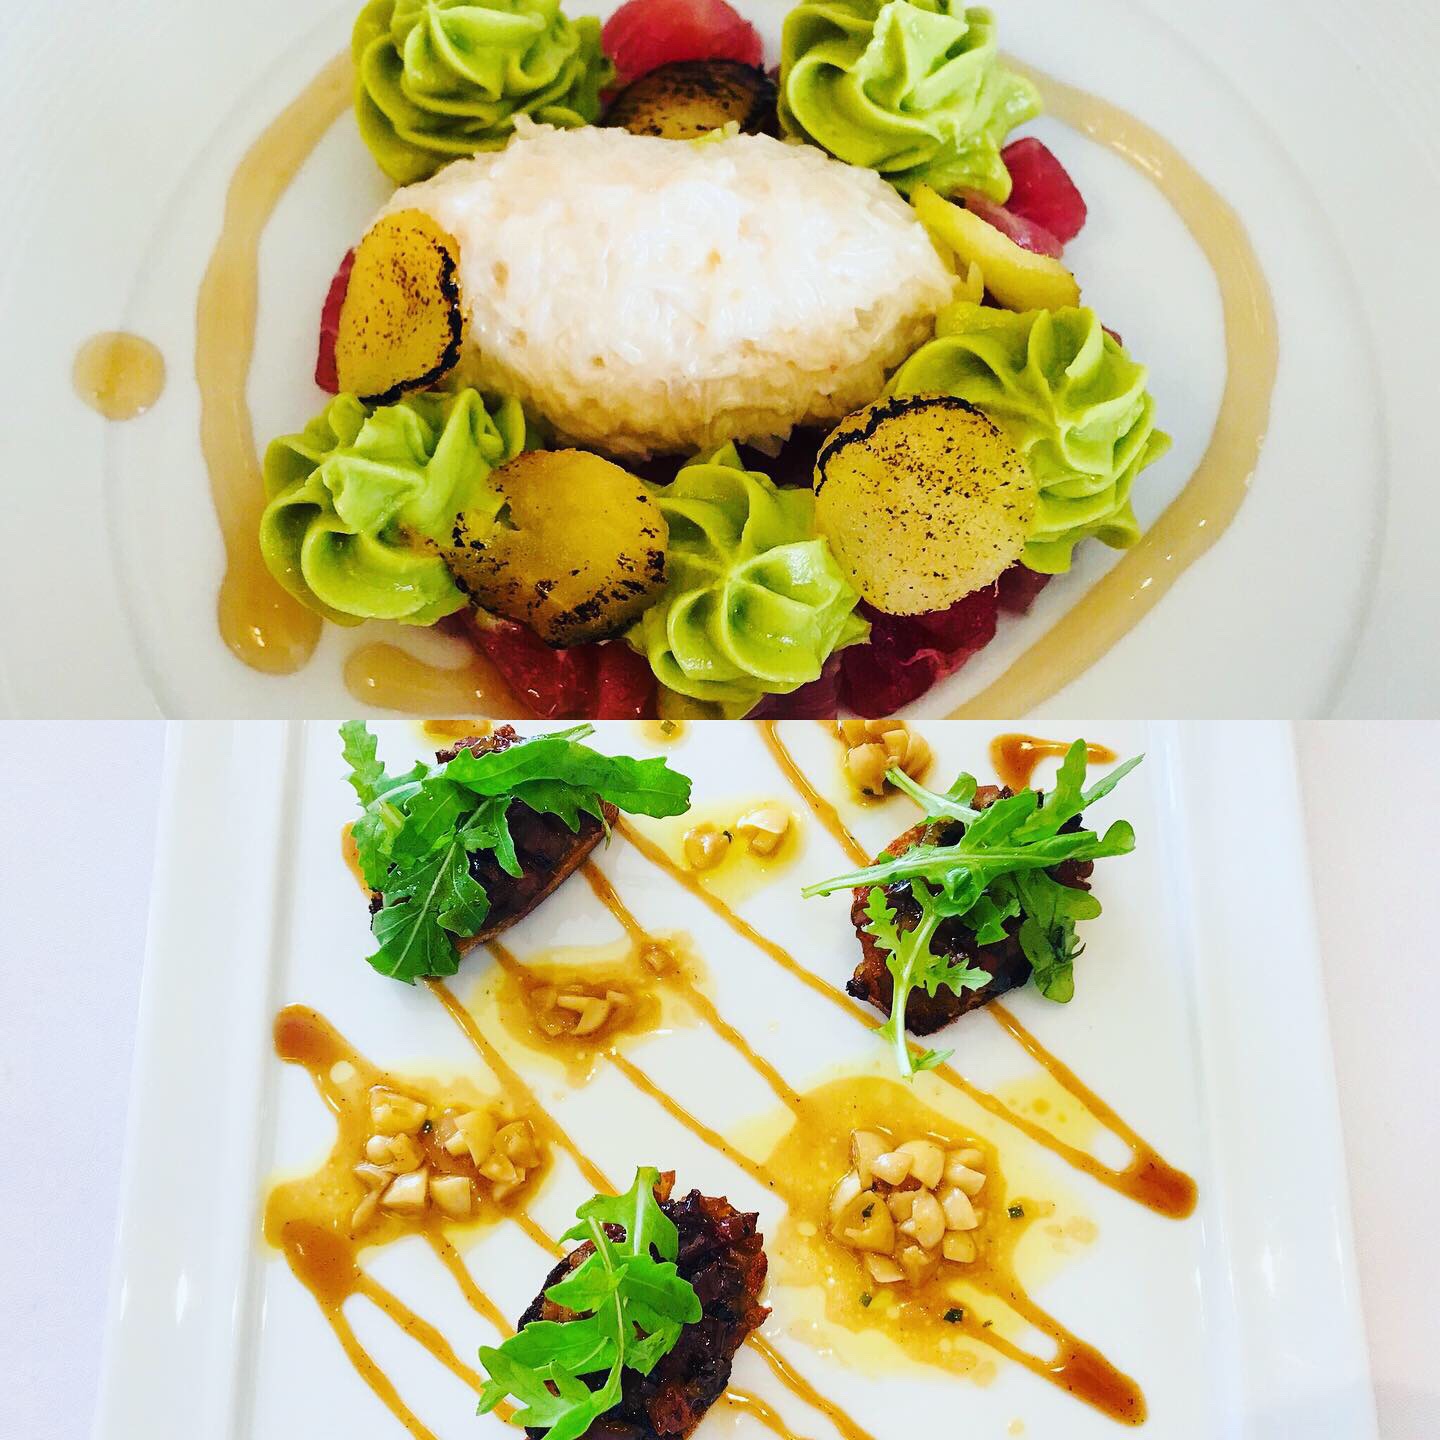
Starters: crab and tuna tartare with avocado, apple and kombu vinaigrette (top) & croutons of braised pigs’ trotters with mushroom vinaigrette (bottom)
We went for their three-courses lunch menu which we felt were very reasonable priced (£35) given the quality of the food and the service plus the complementary appetisers. Since there were only two choices in each course, we decided to simply order them all so we could both have a taste of everything. For starters, I absolutely loved the pigs’ trotters dish as the trotters were tender and rich combined with the flavourful mushroom vinaigrette. 🤤🤤 The crab and tuna tartare was also refreshing and appetising. (My mum loved the presentation.)
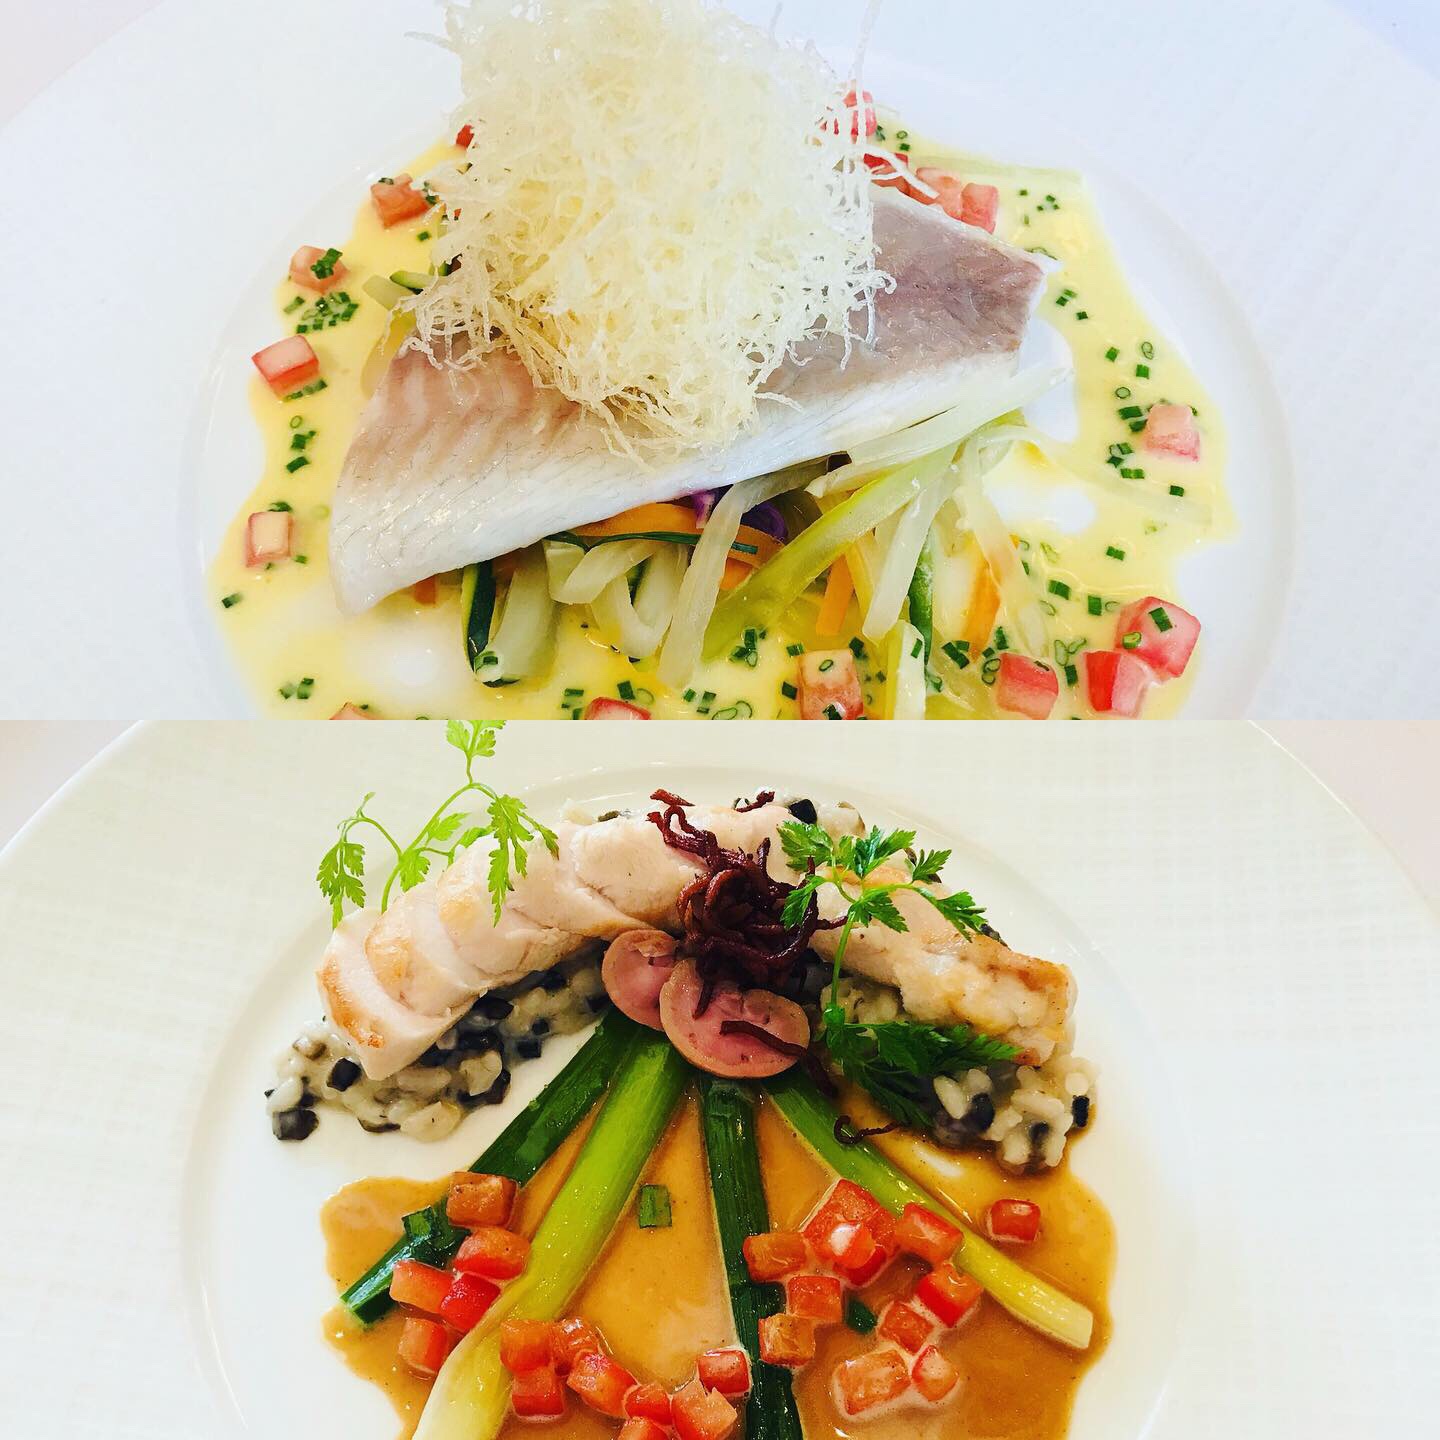
Mains: steamed fillet of sea bream with glazed vegetables and tarragon vinaigrette (top) & roasted saddle of rabbit with baby leeks and mushroom risotto (bottom)
For the mains, here came something that neither of us ate properly before and that was the rabbit. I was very intrigued by how it would taste (as I have heard that it tastes like chicken), and it turned out for me to be the best dish of the day!👍👍👍 The rabbit was almost like a very tender chicken, but also quite gamey and flavourful at the same time. The mushroom risotto was a perfect compliment!❤️❤️ As for the fish course, I found it overall to be nice (I must confess personally I am not a huge fan of steamed fish) but the star of the show for me were the delicious glazed vegetables, and the dish was absolutely stunning to look at.
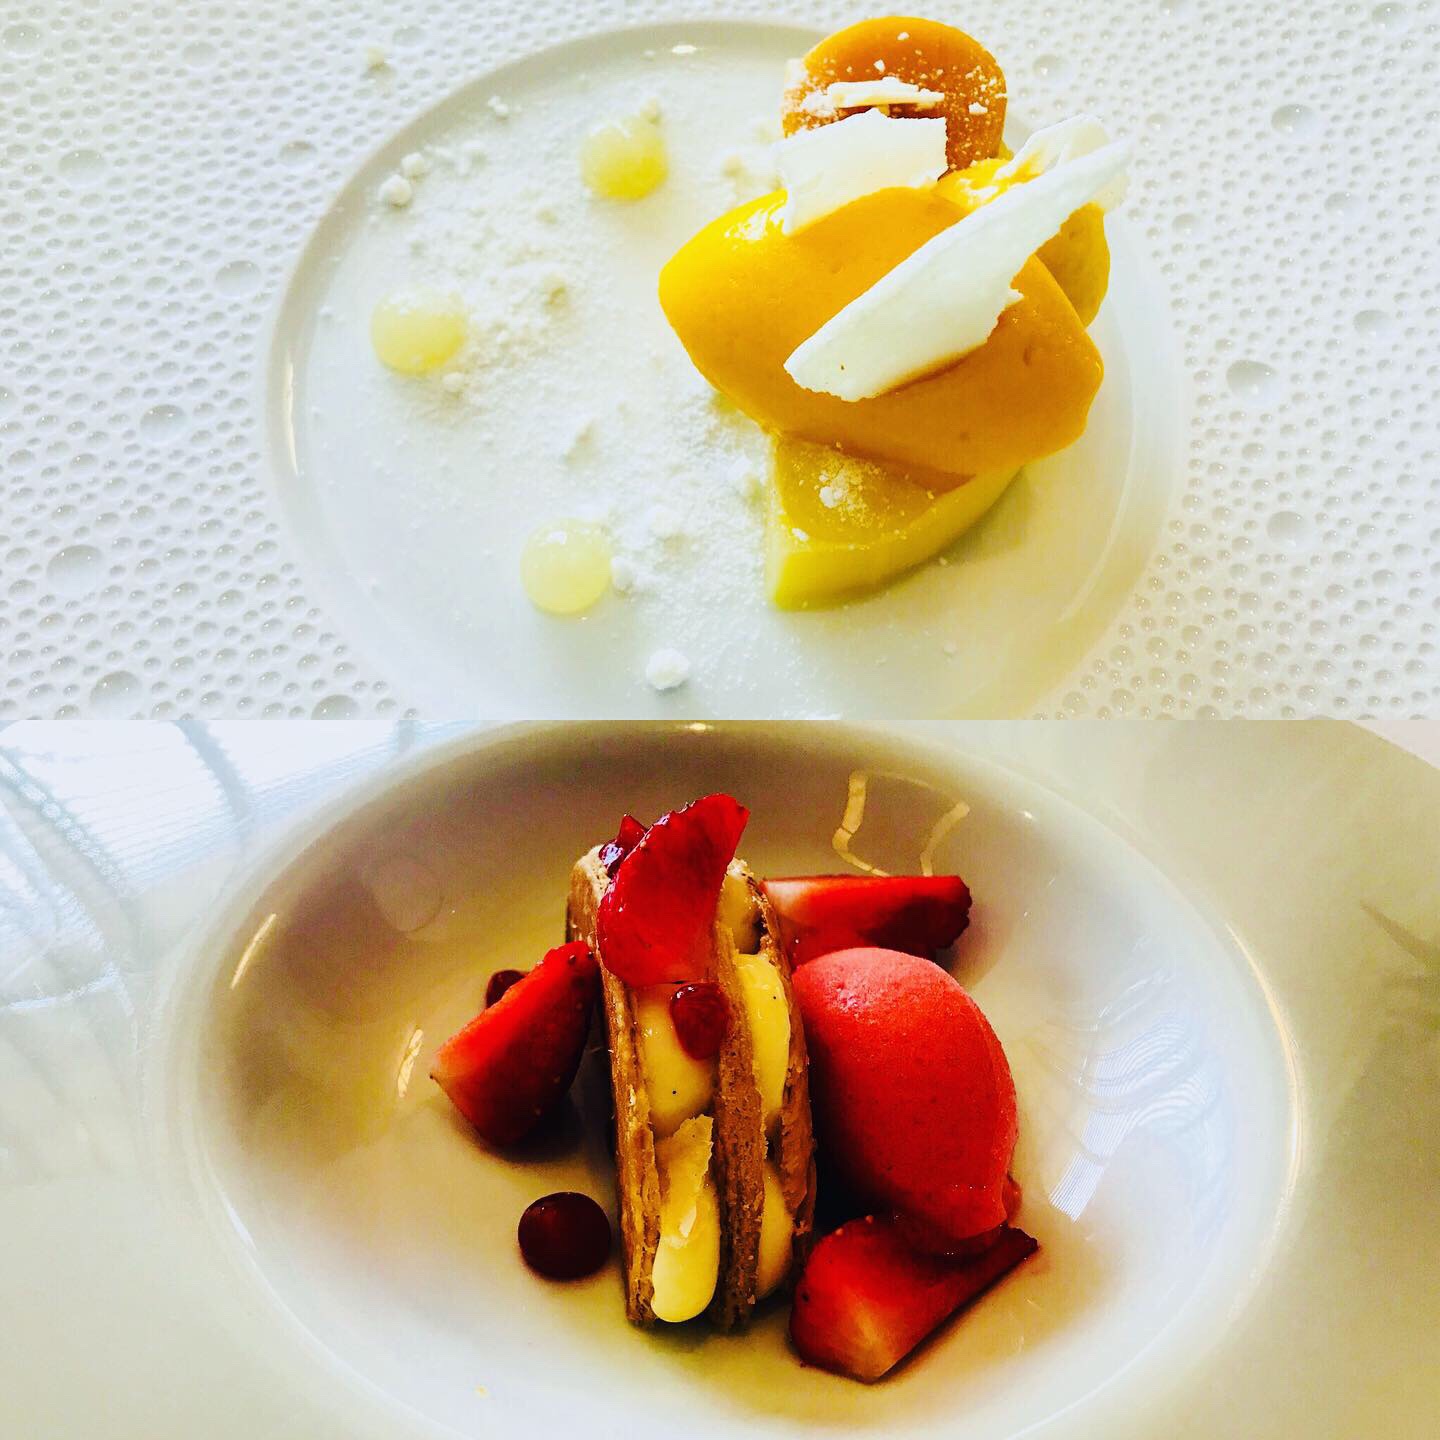
Desserts: white chocolate mousse with passion fruits crémeux, mango sorbet, lime and ginger (top) & strawberry millefeuille with crème légère and strawberry sorbet (bottom)
And finally, of course, it was dessert time! 😋 The white chocolate mousse was absolutely a no-brainer choice for us given its classic combo of passion fruits and mango, and it tasted like just as we expected, tang and exotic. We weren’t sure how the white chocolate mousse would turned out to be like, but it was not overly sweet at all and its subtle sweetness paired very well with the other acidic components.👍 The millefeuille for me was good with its crispy puff pastry and delicious strawberry sorbet, but the flavour profile just wasn’t as exciting as the other dessert.
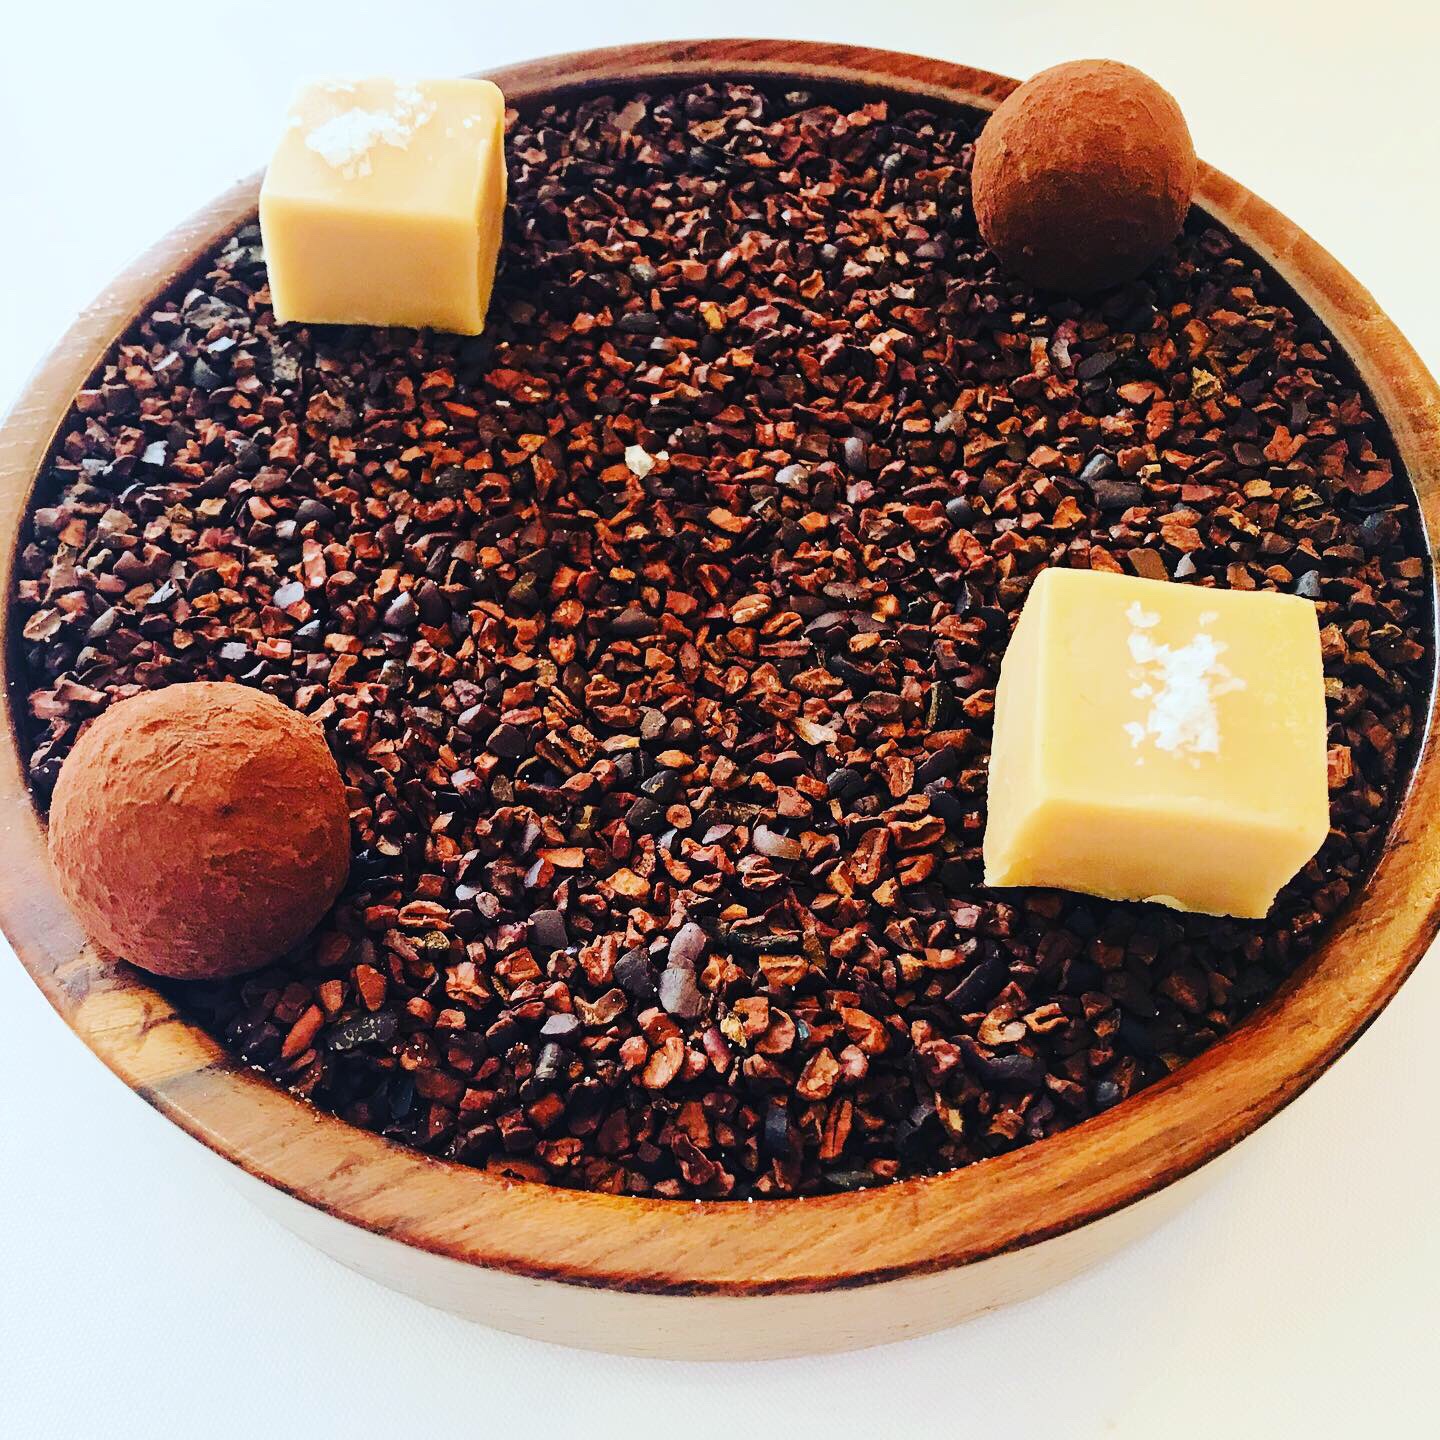
After dinner chocolates – white chocolate fudge & dark chocolate truffles with salted caramel
After a very satisfying meal, there was one final delight with the after dinner chocolates. For someone who is not a fan of fudge and salted caramel, I actually quite enjoyed these chocolates. Moreover, I loved how they served these chocolates over a salt mixture (I was not 100% sure what it is lol) to counteract the sweetness of these chocolates, which for me was ingenious.
What an experience ❤️❤️❤️, and it certainly opened my eyes. But, more importantly, the passion and the love of food were undeniable in these dishes.😊
As we are now firmly in the month of August, the warm weather here in the UK might be approaching to its end (now I might just have jinxed myself with the unpredictability of British weather lol.) With the scorching hot weather, I have completely lost count with the number of ice creams I had eaten in the past months. 😛🍦🍦🍦 But, have you ever tried to make your own ice cream at home? With homemade ice creams, you are free to create any flavours you can imagine and the sky is the limit!
Ice cream is essentially a flavoured, frozen custard, and it is actually a lot more straightforward and easy to make than one may think otherwise (at least in my case lol.) All you really need is a plastic box and a freezer, alongside some stirrings to do and a bit of patience. The first flavour I made is one of my absolute favourite – mango! 😋😋 You can check out my recipe below, and it is also adaptable for other ice cream flavours!
What is your favourite ice cream flavour? 😉
Mango Ice Cream
Ingredients:
300g single cream
100g caster sugar
350g mango puree
250g double cream
1 tbsp lemon juice
Method:
Heat single cream at a lot heat, the stir in sugar until it has completely dissolved.
Pour the cream in a container, then add in the mango puree, double cream and lemon juice. Mix using a whisk until well-combined.
Place the ice cream in the freezer for about 3 hours, or until semi-frozen. Use a fork to fold the ice cream evenly, starting from the edges.
Place it back to the freezer to freeze overnight, or until it is completely frozen before serving.
After what seemed like a very short night of sleep, we continued our second day in Glasgow after checking out the hotel at 10am (yes, that was the official final check out time… 😛) We headed to Bill’s for a conventional full Scottish breakfast (how I missed black puddings lol!), then decided to stop by the Riverside Museum and the Kelvingrove Art Gallery and Museum today before heading back in the late afternoon.
Full Scottish Breakfast in Bill’s
We decided to go by the route via the Glasgow Subway. Unlike the London Underground, it felt much cosier and I actually found their small carriages quite cute lol. 😂
Subway entranceInside the subwayWall painting outside the subway station Hurry up so we can avoid the rain!! 😨🌧Riverside Museum from a distanceHere we are at the Riverside Museum
The museum itself is a transport museum where many of the displays are interactive for visitors, so many of the transports can be climbed inside.
Inside the museumI do like trains! 🚂 This reminds me of the mini vans in Hong Kong.Inside the van. A nostalgic feeling for my mum.Don’t miss it! 🏃♂️🏃♂️
Or, even better, walk in the old streets of Glasgow and taking the old subway. It’s like being transported back in time. 😮
Back in time…I can see the subway! 🚊😉 Anyone wants a pint? 🍺 Guess I can come here if I need some cash…? 😂 😂 Inside the old subway (it actually smells a bit… 😅)
The museum is also well known for the Tall shop from Govan parked outside by the harbour. The ship was built back in 1896 as a cargo ship and visitors were able to also go on board to take a look around. (Totally felt like I was in the Pirates of the Caribbean lol 🌊🌊)
The Tall Ship Does this remind you of the Titanic? Make sure you scrub it clean! 💪💪View from the deckTea or coffee, anyone? ☕️ Now, I feel like the captain! 👨✈️ Could actually imagine me bathing here lol 🛀 The children’s bedroom. Aww kitty… 🐱 Exploring to the depth of the ship… 🤭🤭 (actually only a café and a souvenir shop down there 😂😂)The bottom of the shop (there is a children playground right next to this! 😆)
Before my mum started feeling too seasick (lol), we then decided to move on to the Kevingrove Art Gallery and Museum not too far of a walk away.
Kevingrove Art Gallery and MuseumGreeted by an organ performance upon entering (thought we accidentally stepped into a church service lol)A bit freaky lol… 😅Beautiful paintings 👏👏Probably my favourite painting of the ones I saw ❤️❤️
Tired from all the walking and sightseeing, we finally decided to head for lunch at the Hard Rock Café. The portions were absolutely massive! 😨😅 (Still delicious though haha!)
Inside Hard Rock CaféNachos, Spicy Prawns and Buffalo Sliders
We loved the nachos (No joke, it was probably the biggest plate of nachos I had ever come across in my life!) with its overload of cheeses and spices. The spicy prawns were okay but slightly too much mayo in the coleslaw. I liked the sliders but just couldn’t really taste the blue cheese. The portions were so big that we had to take a huge doggy bag with us on the bus back home! 😂😂 (P.S. we were still having it for lunch today… 😅)
In the Hobbit, Gandalf said to Bilbo Baggins, ‘The world is not in your books and maps. It’s out there.’ There is something about travelling to different places that is vastly different and so much more exciting than simply seeing or hearing about them on TV and on the internet. Compare to the old me who preferred the comfort of staying at home, I now often find myself not being able to stay still on the same spot!
Hence, yesterday, my mum and I headed out for a brief 2-day trip to Glasgow by taking a bus from home. (It was quite last minute as we only decided for sure a few days ago.) The weather, however, was not on our side as the roads were all drenched by the heavy rain all day. But we still made sure that we made the most of it after we arrived.
In Glasgow… 🌧🌧
Marching our way through the rain ☔️ , we dropped by Lychee Oriental for lunch. It is a renowned Chinese restaurant in the area run by Jimmy Lee who once appeared in the Great British Menu on BBC. The restaurant offer a nice two-course lunch every day for a very reasonable price of £11.90. No surprises here except it was a nice, rustic, homey meal that quickly filled us up for the day. (I personally quite liked the chicken satay and the fried noodles.)
Lunch in Lychee Oriental
The weather though really wasn’t appealing enough for us to stay any longer outside, so we decided to check into the hotel and rest a bit first before the evening.
easyHotel (on the right) where we stayed
We stayed at easyHotel which was a very cheap stay, costing under £44 for a twin room for one night. When we arrived though, we were still an hour too early for the official check-in time (3pm). This meant we ended up wondering some more in the rain before hiding inside the hotel opposite to it for the time to pass! 😂
Though the room was generally pleasant and very clean, the shower was very tiny (there was no actual cubicle and the curtains kept sticking to me as I was showering 😅), and also annoyingly (which I only noticed after booking…) WiFi and even the TV are all extra charges. However, for those of you who may be just looking for a quick night of sleep, this is the ideal place for it!
Dinner in Ichiban
While I was napping, my mum was looking at the tourist information leaflet she got from the hotel reception and found this Japanese restaurant called Ichiban. We decided to head there for dinner, squeezing together under one umbrella ☂ (the rain was even worse at that time… 😓😓) We ordered the signature ramen and a mixed sushi platter, plus some char siu (roasted pork) on the side. The ramen was good with a hefty portion and a good broth, and the sushi was also well-made. The char siu though we found was a touch too salty.
Yee Kwan Ice Creams 😋😋
It would be unlike me (or rather us lol) that we didn’t have some desserts after meal. The restaurant also offers Yee Kwan ice creams on their menu (which I knew before from watching Dragons’ Den 😂 ). We ordered the black sesame seed ice cream and pink guava & passion fruit sorbet. The sorbet was perfect with its lightness and sweetness with a slight tang, and the black sesame was very flavourful with the nuttiness from the seeds. (My mum was loving them both lol.) If you see these ice creams for sales anywhere, I would strongly recommend you to grab one! 😋 😂
Afterwards, we headed back to the hotel just as the rain thankfully died down. My mum especially was ready for bed after a long day, but it seemed that our day was not over yet when we discovered there was no hot water in the shower… 😓❌❌ (P.S. we ended up moving to the room next door. 😛)
To cap off the theme of bread week today, I decided to make soda bread, a variety of ‘quick bread’ that does not require yeast or the time-consuming rising process. For this Parma ham, mozzarella and cheddar soda bread, I also served it with my homemade tomato and basil sauce. (This sauce is one of a few things that my mum never criticised whenever I make it lol!😂) Indulging, rich, and almost tastes just like a giant pizza, this is one that would be enjoyed by any cheese-lovers out there!😋
The recipe was adapted from the plain soda bread recipe from ‘How To Make Bread’ by Emmanuel Hadjiandreou.
Parma Ham, Mozzarella and Cheddar Soda Bread with Tomato and Basil Sauce
Quantity: 1 Bread
Ingredients:
For the bread:
250g strong white/bread flour
1 tsp salt
1 tsp bicarbonate of soda
125g mozzarella, diced
50g Parma ham, torn
60g cheddar, shaved
260g whole milk/buttermilk
For the sauce:
4 tomatoes, diced
2 tbsp ketchup
2 tsp dried/fresh chopped basil
A pinch of salt
1 tbsp olive oil
Method:
Preheat the oven to 200C/400F/Gas 6.
In a large mixing bowl, mix the flour, salt and bicarbonate of soda together.
Add the mozzarella, ham and cheddar to the flour mixture, saving a small portion of the ham and cheddar for decoration on top.
Pour the milk into the mixture and mix until it just comes together.
Line a baking tray with baking parchment. Transfer the dough over to the baking tray, shape the dough into a ball and flatten slightly.
Slash a deep cross over the bread using a sharp knife. Place the remaining Parma ham and cheddar cheese over the cross.
Bake for 50-60 mins, or until golden and baked through completely. To check, tap the bottom of the bread, it should sound hollow. If you notice the top of the bread is browning too quickly during baking, place a piece of foil over it.
While waiting for the bread to finish baking, preparing the sauce by cooking the tomatoes in a pan. Add the ketchup and basil, and season with salt accordingly. Put the sauce through a blender to create the smooth sauce. Finish with olive oil.
Once the bread is ready, set on a wire rack to cool briefly. Serve the bread with the sauce while they are still warm.
On this Throwback Thursday and continuing the theme of bread week, I would like to talk about a very memorable bread from my childhood called Bolo Bao, literally translated from Chinese as ‘Pineapple Bun’.
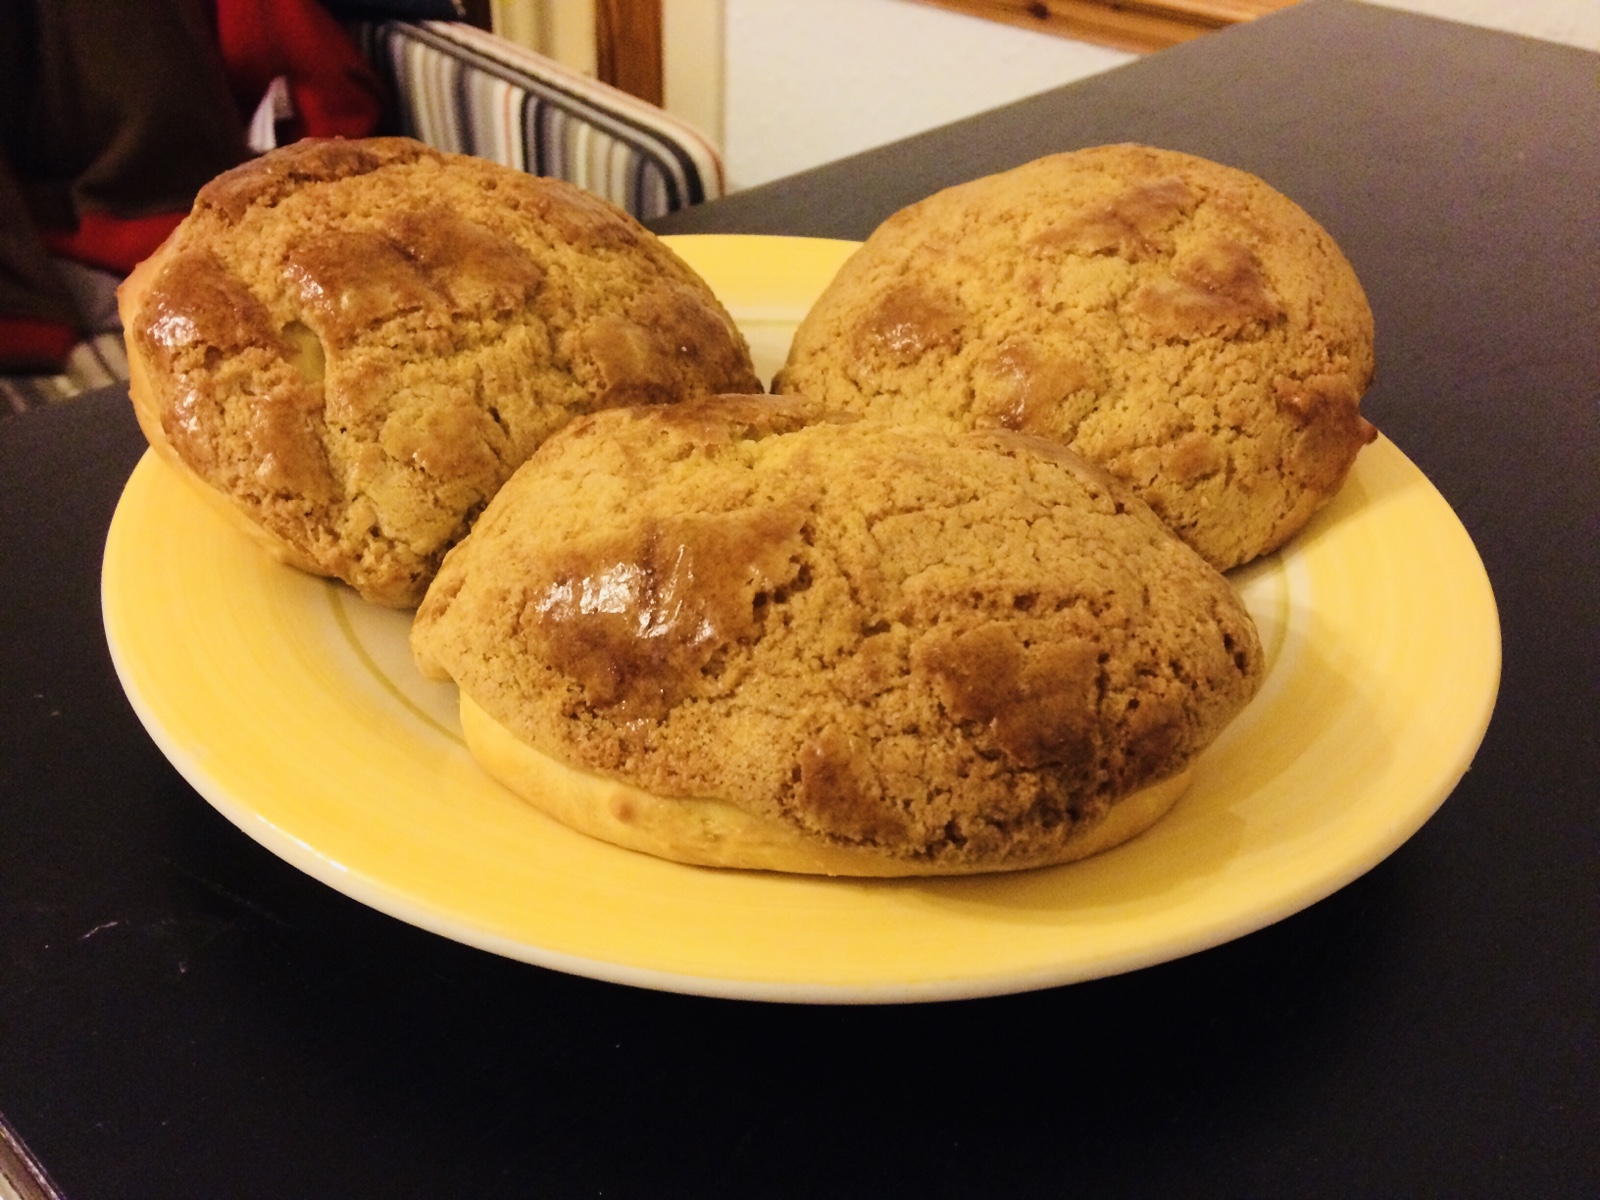
My homemade Bolo Bao
Bolo Bao is a sweet bun originated from Hong Kong. It is an extremely popular treat there (being apparently named as a cultural heritage in 2014), and many people including those in my family enjoy it so much to the point that it is consumed almost every other day. There are many bakeries and eateries in Hong Kong that specialise in this bread, and my mum used to regularly go to a particular eatery to get fresh Bolo Bao that had come straight out of the oven during her work days.😋 Now, just to clarify that despite its name, it has absolutely no pineapple in it! What it does have is the signature sweet, crunchy pastry on the top, which to me resembles a craquelin on a choux bun and tastes like a sugar cookie. And, this crust is the very thing that leads to its name due to its pineapple-like texture and appearance. 🍍🍍 😂
A few years, I tried to make this bread at home and actually turned out to be quite successful with it.😊 The dough is an enriched dough but otherwise the rest of the procedure is fairly straightforward including the crust.
Bolo Bao (‘Pineapple Bun’)
Quantity: 16 buns
Ingredients:
For the dough:
450g strong white/bread flour
60g unsalted butter
110g caster sugar
225g milk
2 tsp yeast
1 large egg, beaten
For the pastry crust:
200g plain flour
60g unsalted butter
60g lard
110g caster sugar
½ tsp bicarbonate of soda
½ tsp baking powder
1 large egg yolk
3 tbsp milk
1 tsp vanilla extract
To prepare the dough, rub the butter into the flour until it resembles fine breadcrumbs in a large mixing bowl. Mix in the sugar.
In a separate bowl, dissolve the yeast in the warm milk. Add the beaten egg to the yeast solution and mix.
Pour the yeast mixture into the flour mixture. Use a wooden spoon and then your hands to bring the mixtures together. Knead for about 10 minutes to form a smooth dough. (The dough will be quite wet but try not to be tempted to add more flour.)
Cover and allow it to rise for 1-2 hours, or until it has doubled in size.
Knock the air out of the dough and transfer it to a lightly floured work surface. Knead again for 2 minutes.
Divide the dough into equal portions and place on a baking tray lined with baking parchment. Leave the dough to rise for about 20-30 minutes.
While waiting for the bread dough to finish its second rise, get the crust ready by starting with rubbing the butter and lard into the plain flour. Mix in the sugar, bicarbonate of soda and baking powder.
In a separate small bowl, mix the yolk, milk and vanilla extract together. Add it to the flour mixture and mix with your hands to bring the mixtures together to form a smooth dough.
Transfer the dough for the crust to a lightly floured work surface. Divide the dough to equal portions and roll them into balls between your hands. Dust the balls with a small amount of flour and, using a rolling pin, roll them out into even, thin circles.
Preheat the oven to 180C/350F/Gas 4. Place a baking tray with a cupful of water at the bottom of the oven to create steam.
Place the crust on top of the buns and brush with an egg wash.
Bake for about 15-20 minutes, or until golden. Then, leaving on a wire rack to cool slightly before serving.
Do you have any memorable bakes from your childhood that speak about your culture? Let’s share in the comments below! 😊
My love for food was definitely stemmed from my family, and they were the ones who first got me into the kitchen. My mum especially was the one who taught me the basis of cooking, and I learnt my first bake from her (which was a Swiss roll). Nowadays, whenever I go back to my family home in Scotland, I always enjoy spending time in my old kitchen and baking (especially seeing how the one in my apartment is tiny!)
It was a very rainy day outside today with lightning and thunder (typical Scottish weather lol), which made it a perfect stay-at-home day for more baking.😉 My mum is my biggest critic, but every now and then we will work together in the kitchen despite the potential bickers.😅 While I am the stronger baker, my mum has always been the stronger cook. So, we worked to our strengths to create some stuffed pita breads with me making the bread and my mum in charge of the fillings.😋
My mum prepared the filling by marinating some beef shoulder and then stir-frying them quickly in the pan, and finished with some toasted sesame seeds. In addition, she prepared a lettuce and red-onion salad. And they were delicious when stuffed into the pocket of the crispy pita bread. 🤤🤤 It was a match made in heaven!
The recipe for my pita bread can be seen below, which was found (yet again 😂) from the recipe in ‘How To Make Bread’ by Emmanuel Hadjiandreou. (Honestly, I will say again if you’re interested in bread making, get this book!)
Pita Breads
Quantity: 6 pita breads
Ingredients:
200g / 1⅔ cups plain/all-purpose flour
4g / ¾ tsp salt
1g / ¼ tsp dried/active dry yeast
120g / ½ cup warm water
Method:
1. Mix the flour and salt together in a mixing bowl.
2. In a separate bowl, add the warm water to the yeast and stir until the yeast has dissolved.
3. Add the yeast solution to the flour mixture. Mix using a wooden spoon and your hands until they come together to form a dough.
4. Cover the dough and let it stand for 10 minutes.
5. After the 10 minutes, knead gently by pulling a portion of the dough up from the side and pressing it into the middle. Repeat another 8 times and the dough should start to resist. Afterwards, cover again and let it stand for another 10 minutes.
6. Repeat step 5 twice.
7. Knead the dough for the last time. Then, cover and let rise for 1 hour, or until it has doubled in size.
8. Punch down the dough to knock out the air and place it on a lightly floured work surface.
9. Divide the dough into equal portions and roll each between your hands to make individual balls.
10. Cover and let it rest for 10 minutes.
11. While waiting, preheat the oven to 240C/475F/Gas 9 and place a baking tray or a roasting pan inside to preheat.
12. After the 10 minutes, use a rolling pin to roll out each ball. Cover again and let it rise for 10 minutes.
13. Dust the pita breads with flour and place on the preheated roasting pan in the oven.
14. Bake until completely puffed up. The cook time will vary, but it should be around 5-10 minutes. Afterwards, cool briefly on wire rack and then serve.
Do you have any stories and interesting cooking with your family? Feel free to let me know in the comments below!😉